Pages

Tuesday, December 6, 2011

My little Indian

Cultures are very unique in many ways. This week in my classroom we have been discussing about Native Americans. After a beginning lesson I let my studetns design their own head dresses and become Indians their selves.

Materials
  1. constuction paper
  2. markers, crayons, pencils
  3. string or yarn
  4. beads
  5. construction paper feathers
  6. real feathers
  7. scissors
  8. glue
Step-by-Step
  1. With a brown piece of paper cut out two strips
  2. Staple or glue the ends together. Make it big enough for the students head.
  3. Have students cut out thier own feathers on red, green, yellow, orange and back paper.

  1. Glue the feather on to the head band.
  2. Next glue on the real feathers close to the constuction paper feathers.

  1. Have students hole punch six holes in their head bands.
  2. On either yearn or string have students place four beads.
  3. On the string that is in the front on the right hand side have studetns place 6 beads in a pattern.
  4. Tie the string on the the head band.

Now you too will have a class full of little Indians.

Busy Spider Webs by Tara Offutt

Materials:  A Very Busy Spider by Eric Carle
                Craft Sticks
                Glue
                Yarn
                Glitter
                PomPom Balls


Step 1: Glue the craft sticks together in any shape you wish. And tie the yarn around one corner.


Step 2: Wind and weave the yarn around the craft sticks in random fashion. Tie the yarn around the craft sticks when the desired effect is finished.


Step 3: Squeeze glue randomly over the yarn and craft sticks.


Step 4: Sprinkle glitter over the glue.


Step 5. Shake off excess glitter and add spider (pompom ball).


Sunday, December 4, 2011

Edible Fire Trucks By: Heather Gordon

1 1/2 Graham Crackers (per)

4 Pretzel Sticks (per)

Red Icing (Can also use white icing with red food coloring)

4 Mini Oreos

1 Maraschino Cherry

  1. Place 1 whole Graham Cracker onto a paper plate or napkin
  2. Place a spoonful of frosting onto the Graham Cracker and spread across
  3. Place 1/2 of a Graham Cracker onto one half of the whole Graham Cracker-This will be the "cab" of the truck
  4. Using a small amount of the icing, "glue" one Maraschino Cherry on top of the "cab"-This will be the Fire Truck's Red Light
  5. Using some more icing, "glue" four Mini Oreos to the sides of the whole Graham Cracker (2 Oreos per side)=This will be the Fire Truck's Four Wheels
  6. Using a little more icing, "glue" two pretzels paralell to each other on the back of the Fire Truck behind the "cab"
  7. Break the other Two Pretzels in half, "glue" the broken pieces in between the paralell pretzels-This will be the Fire Truck's Ladder
  8. ENJOY!!!

Q-tip Painting

Supplies
  • Brown, tan, orange, red, and yellow paint (or any other desired colors)
  • Paint brushes
  • Q-tips
  • White card stock
The students can be given a pre-made tree trunk, or paint it themselves with the brown paint and paint brush. The will be given small cups of the red, brown, tan, orange and yellow paint and 5 Q-tips. After the trunk is painted the students will then use the Q-tips to paint on the "leaves".


Crayon Art-Brittany Clark

The supplies you will need are:
1. Crayons
2. Canvas
3. Blow Dryer
4. Hot glue gun
5.Glue gun sticks

 First you unwrap all of the crayons:

 Then you glue the crayons to the top of the canvas:

 Next you blow dry the crayons:


 Final Result :)


 If you do it in a sink it causes for easy clean up. After the crayon wax dries it scrapes right up.

Twin Tower

How to make a Twin Bride out of popsicle sticks

By: Whitney Nalley

To make a twin tower you will need the following materials:

  • Popsicle sticks
  • Elmer's Glue
To start making a twin tower first you must glue each side of the popsicle stick and lay them beside each other one at a time until you reach your desired width of your bridge. (See picture below)


After you have your floor or foundation done, place it to the side so it may dry and begin your structure. You will need to put a small dot of glue on each end of your popsicle stick.  After that put a dot of glue on each end of the other popsicle stick and lay a popsicle stick on top of the glue going from one popsicle stick with glue to another popsicle stick where the glue is so they will connect, and start the formation of your bridge.  When you start doing this you will then alternate the spots of glue on the sticks by the way you stack them.  (See picture below). Follow this process until you reach your desired height for your tower.


After you follow these steps you will make the top for the tower roof.  Basically this is done the same way you done the floor.  When dry you will glue each of the three pieces together starting at the floor and working your way up to the top.  To get the popsicle stick to come up through the top when the glue is still wet, break a popsicle stick in half and stick it in between the two popsicle sticks on the roof and place some glue around it to help it hold itself up.


I feel this would be suitable for a Elementary level history class for grade levels 1-3.  You may want to use this idea as a craft to help aide in teaching about the twin towers and the tragic incident that happened on September 11th and how this day will be remembered and how it has affect and will continue to affect thousands of lives.

Thursday, December 1, 2011

Snowy Mountain Christmas by: Josh Cook


Materials: Wax Paper; Charmin Ultra Strong Toliet Paper; Green, Red, White, Black Paint; and Paint brushes


1. Layer a rectangle of toliet paper on a piece of wax paper. This layer can be as thick as you wish for it to be. I would not go over 1/8 of an inch.

2. Paint all of the toliet paper white. After this dries, take your black paint and draw mountains on it. Be creative with your mountains! Then paint your mountains a grey (mix white and black). The white at the top of the mountains indicates snow in the background. You can have as many mountains as you wish!


3. Tear off a small piece of wax paper. Here you are going to take about 6 pieces of toliet paper and fold them up the size of one. Dip the paper in water. You will fold the corners of the toliet paper in until you make a point. This will be the top of your tree. You will do the bottom piece the same way, but larger. Then take two piece of toliet paper and fold up to make a trunk for the tree. I made two trees, but you can have students make as many trees as they wish. Paint the trees green while they are still wet.


4. Make little balls with the toliet paper. These will be your berries. Paint these red and let them dry. 

5. Once your trees have dried, place them on your mountains one piece at a time, starting with your trunk, and hot glueing them as you place them on. After placing these, hot glue the red berries onto the trees. If you wish, you can add green paint to the bottom of the mountains to illuminate vegatation.

This is a good project to complete this time of the year. It is simple, yet very fun and creative for the students to complete! It may be a three day project for younger students! Good luck!

Falling Leaves

Falling Leaves by Ashton Reddick

Ages: 4-6

Materials Needed:
Red Paint
Yellow Paint
Green Paint
Brown Paint
Orange Paint
White Construction Paper
Paint Brush
Plates (for paint)


1. Put brown, yellow, orange, and red paint on seperate plates. (Here, I used powder paint but any paint will work)

2. Go ahead and paint the green grass on their papers so it will dry.
3. Allow time for painted grass to dry.

4. Paint the child's forearm. (For older children, you could let them paint a friend or their own forearm!)

5. Have the child spread their fingers and place their hand and forearm down on the construction paper.

6. Now instruct the children to use their fingers to paint different color leaves falling from the branches,

7. VOILA! Complete :)


<3 All of my students really enjoyed this project and their parents love anything that has to do with their hand or footprints, so I knew that they would enjoy it!

classroom unity sand

This project is recommended for teachers to give students an example of unity.  It represents family and togetherness in a classroom.  When students are reviewing over practical living, relationships, families and togetherness they will be able to do this project.  When I did this project I used my preschool class to show them how we all work together, love each other, and help one another.  I allowed each student to chose a color of sand and two at a time I allowed them to pour the sand into the vase.


1. Fist the students choose which color sand they want. Then choose one to two students to pour the sand into the vase.  While the students are pouring in their sand have them say one way to be a good family with their classmates.  Once they are finished display all year for the students to remember unity in the classroom.  At the end of the year scoop out about a tablespoon of the sand and give it to each student so they will always have a piece of their family with them.  


Hands And Feet Are For Helping by Leandra Cherry

Bullying has become an issue that has increased in the past few years. Before you do this activity talk to the students about how bullying is mean and can hurt others. Tell students that they can help stop bullying by speaking out. This activity is a pledge that students sign with their hands and feet.

1. Get a big white sheet of paper and paint " We Use Our Hands And Feet For Helping."

2. Have half of the students take off their socks and shoes and paint one foot at a time.

3. Then place their foot on the paper and then paint the other. TIP: have the paper close to where you paint the child's foot so as to not get paint everywhere. Also have baby wipes and a towel close so you can wipe the children's feet off.


4. Then write the student's name under their footprints with a marker.

5. Then paint the hands of the other half of the students. They can spread their fingers and place their hands where their thumbs are touching.

6. Then have the students wash their hands and write their names under their hand prints.

7. Let their hand and footprints dry and then hang the banner up in the classroom.


Theresa Watson: How to make a Dream Catcher

This project is for all ages, from the primary to high school and adults classes.
This is a class that show how the Native Americans delt with their childrens bad dreams. America is a country that has different cultures and nationalities. Most Americans are a part of more than one nationality.  

1. The material that will be needed:
  • Yarn
  • Twine
  • Tape
  • Round object or small tree limb
  • Feathers
  • Scissors


2. You take the twine and wrap it around the object that you have selected to be the main part of the dream catcher. Cover the base of the dream catcher until it is completely covered.
 3. Once the circle is completely covered, you will start making a design inside the dream catcher. I chose a star to be my center.
 4. Take yarn start making the design that you want to make inside the dream catcher.  Start on one end wrap it around a few time a start making the star, going from one side to the other until the design is complete.
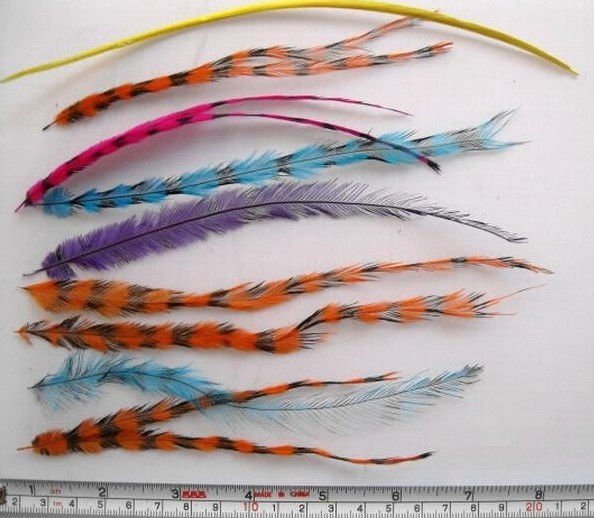
 5. Once the star is complete, we start attaching feather to our dream catcher. Attach yarn to the feather by tying the yarn around the feather and knotting the yard. Tape the yarn down and tie the yarn to the dream catcher. Once all the feather are attached let tie a piece of yarn on the dream catcher so that we can hang it on the wall.


This project can be changed according to the student age. As the students get older the material for the dream catcher can become more harder to use.

Primary can use paper plates and beads and yarn.

Middle school can use wire and  and beads or feathers. Look up the history about dream catchers

High school and Adult Ed classes can use tree limbs that can be soaked in water so that they can been into a circle and wired down and feathers. They can also write an essay about Native American culture.

Theresa Watson